I love working with paper as it is such a versatile material. Paper exists in a variety of textures and thickness, giving you the opportunity to create small, precise and flexible objects as well as larger and stronger ones, such as boxes and even furniture.
Thin paper
You can create lovely flowers with tissue paper and crepe. The thinness and flexibility of those papers enables you to work on the shape by creasing for example. And it is perfect to render the texture of flower petals.
Cardboard
If you want to create a more resistant or larger object I'd suggest using cardboard. You can find cardboard in a great range of thickness, from thin if you need to fold or work the shape, to thick if you need to make stronger objects such as frames, boxes and even pieces of furniture.
Yes this cupboard is made of cardboard. I realised this piece two years ago during a workshop given by Valérie Chauvenne at Le Show du Carton. In a next postI will explain how I realised it showing pictures of every stages.
The next post will be dedicated to customisation. I'll explain how to give a new look to objects with paper using techniques such as scrapbooking and stamps.
Sunday, 28 July 2013
Saturday, 20 July 2013
Creation: triggers and process
I've been crafting with paper, scissors and glue for as long as I can remember. Maybe I should find another word for crafting as it does not really express what it means to me. For me crafting is a real moment of fun in which I can fully express myself, let myself go... well, be me.
I really enjoy to create with paper,especially making cards.
But what triggers the making of a card ? It varies from the followings: the birthday of someone I care is coming on, another creation has inspired me, ideas running in my head or simply the need to create.
My crafting process is pretty much the same everytime: it begins with one of the triggers mentioned above, then I come up with a design, I gather the needed material, I create, I finish up with adding The final touch (doodles doodles...) and it's done. I love each part of the process with probably a preference for the design part. To come up with a design I usually think of the purpose of the creation and the person it is meant for. When making a card for example, I first think about the type of card: is it for a birthday, a wedding, a celebration, a new-born baby... (quite logical indeed). Then I think about the person who it is meant for: what does he/she like (hobby, passion, favourite colour...) and I make sure my card will reflect this. This can be done using special patterned papers, stamps... And believe me it works; the comments from the one who got the card are the greatest reward ever.
A few examples below:
- a card for someone passionate about music and birds
- birthday cards for someone who loves flowers
- a congratulation card to motivate someone excell (star) in the new job
Feel free to leave of comment and / or ask questions.
Saturday, 13 July 2013
Patterned papers
I L O V E patterned papers.
They exist in a huge variety of designs, colours and materials.
And they are so easy to find.
- Many craft magazines (1) offer them in their latest issue.
- You can buy them from craftshops (2) or via one of the oh so many webshops.
Patterned papers are very easy to use and enable you to make a nice card in a very short amount of time, even if you run out of ideas. You just need to put 2 patterned papers together and add some extra features (embellishments, text, buttons, flowers, doodles...) and that's it!
Like the 2 birthday cards below. Both cards were made in 5 minutes!
For the first card I used 2 patterned papers as background. I added a paper butterfly and a Happy Birthday tag (offered in one of the Papercrafter issues). To finish off I added some doodles with a coloured marker.
For the second card I added an extra piece of patterned paper on the top edge.
(2) Craft shops in Edinburgh: Stamper Grove, Hobby Craft.
Wednesday, 10 July 2013
Holiday in France
I just got back from a 10-days holiday in France.
What a great holiday full of discoveries and gorgeous weather. I stayed a few days in the South of France discovering the villages of Séguret, Sablet and Vaison-la-Romaine before going to la Ville Lumière.
Here's a brief summary of my journey.
It started in the small village of Séguret, hometown of my sweetheart.
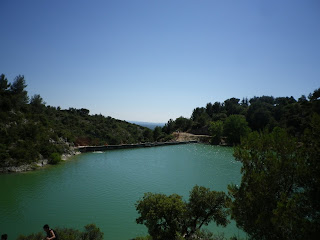
We chilled out on Sunday afternoon at the lac du Paty and were darous enough to have a swim in the oh so cold water.
I then explored the lovely medieval town of Vaison-la-Romaine and bought some local products on the weekly market. One of the most interesting aspects of the town is its geography and its Roman ruins. The Roman ruins and the modern town are in the valley on the banks of the river Ouvèze which is crossed by an ancient bridge from the 1st century AD.
More info about Vaison-la-Romaine here: http://www.provenceweb.fr/e/vaucluse/vaison/vaison.htm
During my stay in Provence I met lovely and interesting people. My sweetheart's family give me a very warm welcome and made me discover great spots, such as the Groseau waterfall.
More info here: http://fr.wikipedia.org/wiki/Groseau
http://www.ledauphine.com/vaucluse/2010/08/13/la-source-du-groseau
We then headed back north to enjoy the rest of our holidays in Paris. Thanks to the gorgeous weather we enjoyed lovely walks and picnics and lots of ice creams...
It was the week of the Paris movie festival and there were a few belgian movies on the list. We chose to watch Kid, a tough and deep movie from Fien Troch. We also went to the Cité de la Musique and view a very interesting exhibition dedicated to music and cinema (Musique et cinéma: le mariage du siècle).
I really enjoyed my time in France. I came back full of energy, with a lovely colour on my natural pale skin :-) and with more love in my heart.
What a great holiday full of discoveries and gorgeous weather. I stayed a few days in the South of France discovering the villages of Séguret, Sablet and Vaison-la-Romaine before going to la Ville Lumière.
Here's a brief summary of my journey.
It started in the small village of Séguret, hometown of my sweetheart.
Séguret is a small village in Vaucluse. It is surrounded by the dentelles de Montmirail and the Mont Ventoux. It belongs to one of the most beautiful villages of France. The village lies at the foot of a hill topped by the ruins of its feudal castle. And it is also famous for its excellent Côtes du Rhône wine. More infos about Séguret here: http://www.provenceweb.fr/e/vaucluse/seg
We chilled out on Sunday afternoon at the lac du Paty and were darous enough to have a swim in the oh so cold water.
I then explored the lovely medieval town of Vaison-la-Romaine and bought some local products on the weekly market. One of the most interesting aspects of the town is its geography and its Roman ruins. The Roman ruins and the modern town are in the valley on the banks of the river Ouvèze which is crossed by an ancient bridge from the 1st century AD.
More info about Vaison-la-Romaine here: http://www.provenceweb.fr/e/vaucluse/vaison/vaison.htm
During my stay in Provence I met lovely and interesting people. My sweetheart's family give me a very warm welcome and made me discover great spots, such as the Groseau waterfall.
More info here: http://fr.wikipedia.org/wiki/Groseau
http://www.ledauphine.com/vaucluse/2010/08/13/la-source-du-groseau
We then headed back north to enjoy the rest of our holidays in Paris. Thanks to the gorgeous weather we enjoyed lovely walks and picnics and lots of ice creams...
It was the week of the Paris movie festival and there were a few belgian movies on the list. We chose to watch Kid, a tough and deep movie from Fien Troch. We also went to the Cité de la Musique and view a very interesting exhibition dedicated to music and cinema (Musique et cinéma: le mariage du siècle).
I really enjoyed my time in France. I came back full of energy, with a lovely colour on my natural pale skin :-) and with more love in my heart.
Wednesday, 12 June 2013
Bird serie - 2
The bird serie is finally ready after some delay due to a major distraction: the SUN.
It's been sunny all week here in Edinburgh and I couldn't resign myself to stay inside. I had to go out and enjoy lazying about in the park with a book and have a chat with friends :-)
And to be honest I also kept on postponing bying frames...
Anyway the serie is now ready. And I am sharing with you how I realised it.
I already had selected the patterned papers I wanted to use as background (see previous post Bird serie - 1).
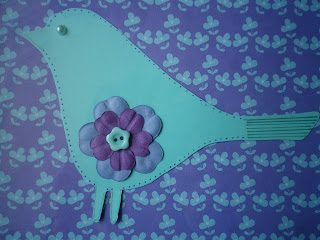
I chose plain coloured cardboard matching the background papers and I cut the bird template in it. I then decorated each bird with various embellishments (flowers, buttons, paper lace doilies), I highlighted the border with a pen and I used a flat pearl bead for the eye).
I then glued each decorated bird on the assorted background paper. I also added some extra elements such as stamps, flowers, buttons and leaves to fill up the empty spaces without overloading the page though. I wanted to keep it simple (more in the clean & simple style); the focus should remain on the bird. And after doing that, the birds were ready to be framed!
As I could not find any frame in the colours I wanted, I decided to buy cheap frames and to paint them so they would match the birds designs.
I started sanding each frame to take off the varnish and to prepare it for the painting.
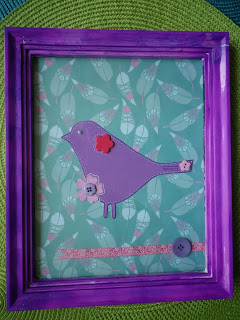
On 4 frames I used a semi-liquid light violet metallic colour (see pictures of violet frames 2,3,7,8). On the 4 others (see pictures of frames 1,4,5,6) I used white gesso as primer coating and then I put Adirondack Alcohol ink - applied with a sponge. On frame 8, I added a stamp design on the edges. And this is what it looks like:
I really enjoyed working on this serie and it did not request a lot of effort. Once you have a clear idea of what you want (I usually start doing some sketches on paper) and which paper to use, it goes pretty quick. You just need to cut, arrange, glue and frame. Moreover you don't need a lot of material. To realise the serie, I used the followings:
- 8"x10" frames - you can buy cheap ones and decorate/customise them (as I did) or buy ready made ones;
- white gesso paint and alcohol ink to decorate your frame;
- patterned papers to use for the backgrounds (I used free samples from Papercrafter magazine);
- various plain coloured papers for the birds - to match or contrast with your patterned papers (any leftovers will do);
- embellishments: buttons, ribbons, flowers... anything you fancy to embellish your design.
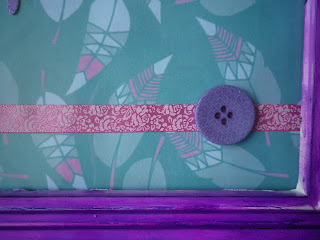
The pictures below with details show you how easy it is to obtain nice results with just a few extra elements.
I hope you'll enjoy it.
If you have any questions concerning the materials, the techniques or anything else, I'll be happy to get back to you.
Don't hesitate to leave a comment or send a message. Any feedback is welcome.
It's been sunny all week here in Edinburgh and I couldn't resign myself to stay inside. I had to go out and enjoy lazying about in the park with a book and have a chat with friends :-)
And to be honest I also kept on postponing bying frames...
Anyway the serie is now ready. And I am sharing with you how I realised it.
I already had selected the patterned papers I wanted to use as background (see previous post Bird serie - 1).
I chose plain coloured cardboard matching the background papers and I cut the bird template in it. I then decorated each bird with various embellishments (flowers, buttons, paper lace doilies), I highlighted the border with a pen and I used a flat pearl bead for the eye).
I then glued each decorated bird on the assorted background paper. I also added some extra elements such as stamps, flowers, buttons and leaves to fill up the empty spaces without overloading the page though. I wanted to keep it simple (more in the clean & simple style); the focus should remain on the bird. And after doing that, the birds were ready to be framed!
As I could not find any frame in the colours I wanted, I decided to buy cheap frames and to paint them so they would match the birds designs.
I started sanding each frame to take off the varnish and to prepare it for the painting.
On 4 frames I used a semi-liquid light violet metallic colour (see pictures of violet frames 2,3,7,8). On the 4 others (see pictures of frames 1,4,5,6) I used white gesso as primer coating and then I put Adirondack Alcohol ink - applied with a sponge. On frame 8, I added a stamp design on the edges. And this is what it looks like:
I really enjoyed working on this serie and it did not request a lot of effort. Once you have a clear idea of what you want (I usually start doing some sketches on paper) and which paper to use, it goes pretty quick. You just need to cut, arrange, glue and frame. Moreover you don't need a lot of material. To realise the serie, I used the followings:
- 8"x10" frames - you can buy cheap ones and decorate/customise them (as I did) or buy ready made ones;
- white gesso paint and alcohol ink to decorate your frame;
- patterned papers to use for the backgrounds (I used free samples from Papercrafter magazine);
- various plain coloured papers for the birds - to match or contrast with your patterned papers (any leftovers will do);
- embellishments: buttons, ribbons, flowers... anything you fancy to embellish your design.
The pictures below with details show you how easy it is to obtain nice results with just a few extra elements.
If you have any questions concerning the materials, the techniques or anything else, I'll be happy to get back to you.
Don't hesitate to leave a comment or send a message. Any feedback is welcome.
Subscribe to:
Posts (Atom)


